Lesson Learned: DIY’s may turn into a confession session.
Before we dig into the details of how we refinished our kitchen table, I have a couple of confessions!!! Hey! My mom always said: “honesty is the best policy”!
So… for my first confession: I actually completed the table before deciding that I would blog about our home projects, so I apologize in advance for the lack of pictures along the way! I will do my best to find pictures on my phone that will suffice.
Another confession– well not so much a confession but a freaky coincidence. While I was searching for images of tables that looked similar to the table we started with, I realized that during the home inspection the current homeowners (of the house we are buying) have the EXACT same table we refinished. HOW WEIRD?!?? So during a later walk thru, I managed to sneak a picture of their table-so I’m very sorry for the low quality!

As for my last confession, we inherited the table from a family friend about 12 months before we even knew we were capable of buying a house! The table was pretty ugly but I was too polite to say no and quite frankly, did not particularly wish to buy one if I didn’t have to. Everyone loves something for free, right?!! So the poor table sat in my Mom’s garage for nearly 6 months before I had an idea of what to do with it and make it pretty again (Thank you Pinterest and Joanna Gaines!) Even once the table was finished it stayed in the garage for another 2 months until we moved in.
Sand until your heart is content , and then some more…
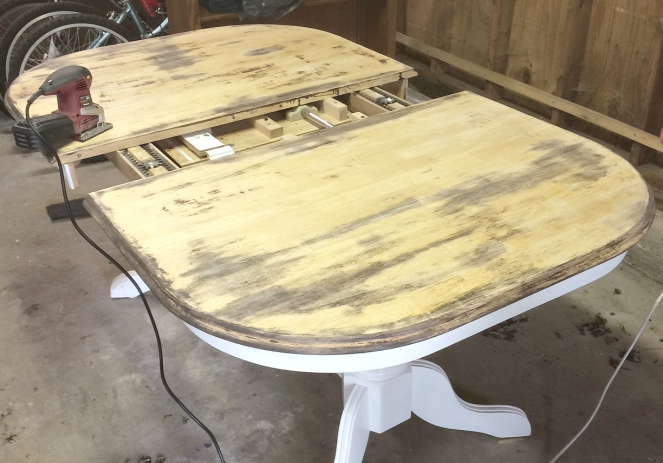
Sanding is probably the most important step. The table had an ugly light brown finish that needed to be removed in order for the stain to stick. We started with a low grit to really dig in and get the top coat off. This part was the MESSIEST!! As a disclosure, I would 10000% recommend doing this outside and far away from anything you do not want to be covered in dust. Jason eventually looked as if he had been through a desert sandstorm. It probably took us a couple of hours, using the electric sander & hand held paper to sand all grooves and edges. But it was warm and sunny outside so with a little bit of music to sand along to it wasn’t exactly torture. Make sure to finish off your sanding with a higher and finer grit. This will ensure the top of your table is as smooth as can be, like a factory finish. I finished with a 240grit.
Sanding is probably the most important step. The table had an ugly light brown finish that needed to be removed in order for the stain to stick. We started with a low grit to really dig in and get the top coat off. This part was the MESSIEST!! As a disclosure, I would 10000% recommend doing this outside and far away from anything you do not want to be covered in dust. Jason eventually looked as if he had been through a desert sandstorm. It probably took us a couple of hours, using the electric sander & hand held paper to sand all grooves and edges. But it was warm and sunny outside so with a little bit of music to sand along to it wasn’t exactly torture. Make sure to finish off your sanding with a higher and finer grit. This will ensure the top of your table is as smooth as can be, like a factory finish. I finished with a 240grit.
As for the legs I sand over with a 120 grit to remove the shine and remove any knicks and bumpy bits. It was going to be painted so I did not need the open grain for the stain to soak into.
Disassemble the top and paint the legs!
This part is verry easy in comparison to every other step. Once the legs were sanded down, I painted with the SW Pro-classic paint in Marshmallow (the same that was used for the dresser). I painted 3 coats total to make sure everything was fully covered, and once all was dry finished with the Minwax polycrylic. Again, I want to make sure the legs are as durable as can be, since people will be bumping their dining chairs and what not into them!
Staining the top…ishOk I have another, 4th confession… during my first go at staining I realized I did not sand enough due to my impatience and lack of know how. I will share that error and tips for staining when I get the courage together to write about the currently repressed memory (wah!).
Pain Staining Process AGAIN….Second time was a charm, but then again, this time I was prepared. I had used paint stripper to remove coatings left on it and I had had Jason sand the whole top down with 80, 120 and 240 sandpaper. I got out the pre-stain wood conditioner I had used previously on my dresser refinish, wiped it on, let it soak in for 15 minutes and then wiped off the remainder.
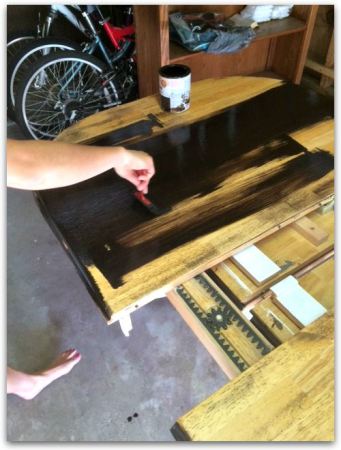
Next I used my foam brushes and ‘Kona’ stain, the same used for my dresser top. I painted the stain on pretty thickly as you can see here. I waited a few minutes to let the stain soak in, and used a few rags to wipe the stain off.
Protect her with some Polyurethane…
Once the stain had soaked for about 15 minutes, I wanted to apply a layer of polyurethane to protect the top of the table. Of course, a kitchen table top will take a beating as it is used so often, and polyurethane is a great barrier. It is slightly tinted yellow, so I didn’t mind applying to a stained top. I used this polyurethane. As simple as following the can… I wiped a thin and even layer on with a clean foam brush and let it dry. Make sure there are no bubbles when applying the poly. If you find you have some small bubbles, use a very fine sandpaper to get them out!
She’s finished… well almost!!
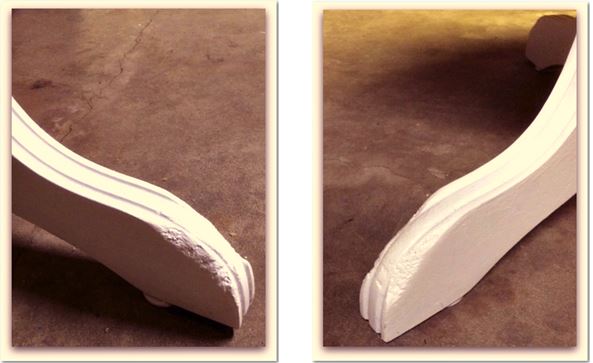
Dog Chewed Legs, My favorite…Ok, ok my last confession. I swear I thought that with some sanding and some paint the chewed legs would not be noticeable, but how wrong was I? However on a freshly finished table they stuck out like a sore thumb so it was obvious I needed some way to repair this eye sore. The left picture is pretty horrific and the legs looked very sorry for themselves.
Off again I sent Jason to Home Depot, in a somewhat bad mood ( I love you!!), in search of a filler or something. After a few conversations with experts and some google searching on their recommendations he returned with J-B Weld Kwikwood. This stuff is a filler and magic all wrapped up into one stick of the adult version of play-doh!
More details on how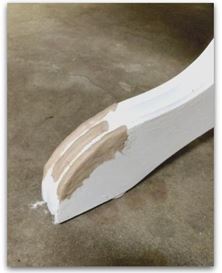 we repaired the legs can be found [here].
we repaired the legs can be found [here].
However for a quick summary, we lightly re-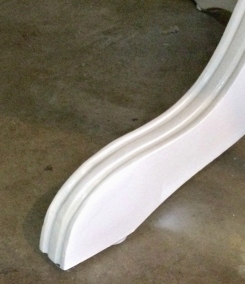 sanded the chewed area to removed most of the paint we had put on. Next we molded the Kwikwood onto the legs to resemble the grooves that once existed before the dogs teeth got hold of them (Sue, we love Smoky and Bandit promise!). We let the kwikwood dry over night and sanded- AGAIN. Like I said earlier, sand, sand and sand some more until you are happy with its shape… you are now free to paint away.
sanded the chewed area to removed most of the paint we had put on. Next we molded the Kwikwood onto the legs to resemble the grooves that once existed before the dogs teeth got hold of them (Sue, we love Smoky and Bandit promise!). We let the kwikwood dry over night and sanded- AGAIN. Like I said earlier, sand, sand and sand some more until you are happy with its shape… you are now free to paint away.
And ta-dahhh… this image on the right is how it looked after some touch up paint. Not 100% perfect, but 1000% better than what it was before!
It’s a wrap!Once I had finished the table it pained me to admit I had no house to put her in. We were still waiting for our closing date at the time so, I wrapped her up for protection and left her in my Mom’s garage until move in day. It was (slightly) emotional- both Jason and I had spent a few Saturday’s on this project and wouldn’t put her to use for a number of weeks.
This was our good bye picture I took before carefully wrapping her up…

Welcome home!
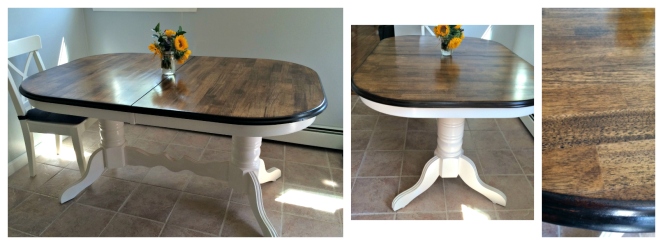
Adorned with some pretty flowers as a “welcome to your new home” present, here she is! The lighting is much better in these pictures and you can see how beautifully the stain took to the wood.
Adorned with some pretty flowers as a “welcome to your new home” present, here she is! The lighting is much better in these pictures and you can see how beautifully the stain took to the wood.

From our obvious lack of seating, all that’s needed now is for Jason to build me a breakfast nook bench in the corner (did I mention I love you J??).
Overall, the kitchen table redo was a long and painstaking process (due to my few mistakes) but totally worth it! I hope I have shared much insight on what to do, and also what not to do. Probably more of the what not to dos, but hey, they all help right?
Much love!!

Beautiful!
ReplyDelete