Lesson Learned: What’s seen in Vegas doesn’t always stay in Vegas.
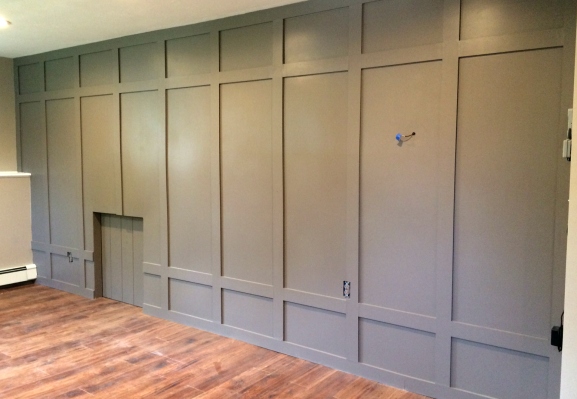
Guys!! Before I get started, can you please just take a look at this finished product?? Ahhh I love it!
Okay, soo do you remember the horrendous mess that was left after basement renovation part 1? Well if not, here’s where you can see it..but for those of you who are lazy, here’s a quick recap for you! Hopefully you understand why I nearly had a heart attack every time I walked down the stairs and saw this!!


Since our part 1 of the renovation, we removed and threw away all of the trash we could (thank you to my dad for letting us use his dumpster!!). We then began replacing the torn up drywall by hanging new drywall. As usual, I left Jason alone for this portion of the project, and he forgot to take a sufficient amount of pictures! Here is a celebratory picture I received when the first piece of drywall went up…

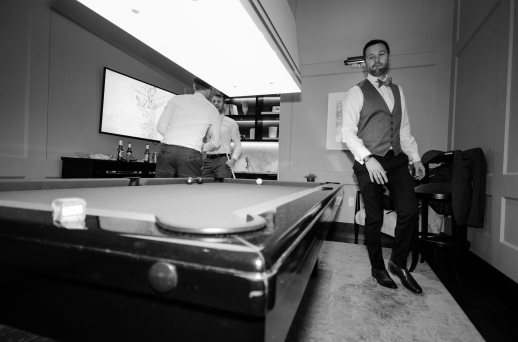
Before we dig deeper, let me tell you a little about the inspiration for this paneled wall. It actually came from our recent trip to Las Vegas for Jason’s Brother’s wedding. Prior to the ceremony Jason and his brothers played pool in a billiards room at the Aria chapel. I guess the room was decorated beautifully and had a paneled wall Jason fell in love with. Like I’ve said before, if there’s a will there’s a way, and trust me when I say there was much of a will to have this paneled wall in our home. Here is a wedding picture which shows the inspiring room. You should be able to see the paneling to the right of Chris (the groom!!).
So after we returned from the wedding, we discussed our plans for the paneled wall. We agreed the large wall in the basement would be the perfect location, but I really thought we should have rectangles and not squares. Rectangles seem to trick the eye and make the room appear grander, which is of course what we want!
P.S.. The time in between the Basement demo part 1 and starting this project was a couple of weeks, I don’t want you all thinking this happened in one weekend!
The Plans
In short, our plan was to cover the newly dry-walled wall with a hardboard to make sure we start with a smooth, blank canvas.. and then add the panels on top. So here’s how we started.
After the new sheet rock was hung, we added a layer of joint compound over all of the joins. Since this wall was going to be fully paneled, we didn’t worry too much about making this wall perfectly smooth like all of the other walls. We left the compound to dry overnight.
I guess I should mention if you feel like you would want to take the time and make your wall perfectly smooth, you could avoid the need to hang a hardboard across the whole thing. In our case, $40 was okay to spend on this hardboard from Lowes. It covered the entire wall, allowing us to avoid wasting time sanding and fussing over imperfections.
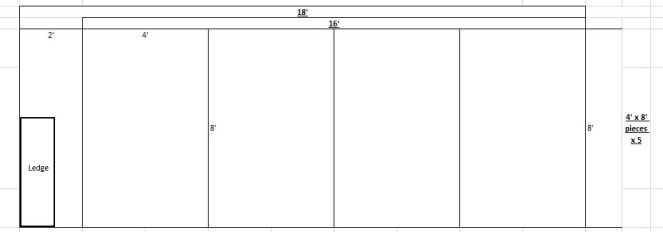
Luckily, our ceilings are 8ft high and the hardboard panels come in 4′ x 8′ sheets. We needed 4 full sheets and then half a sheet to make up the 18′ width (see below).
Hanging the Hardboard
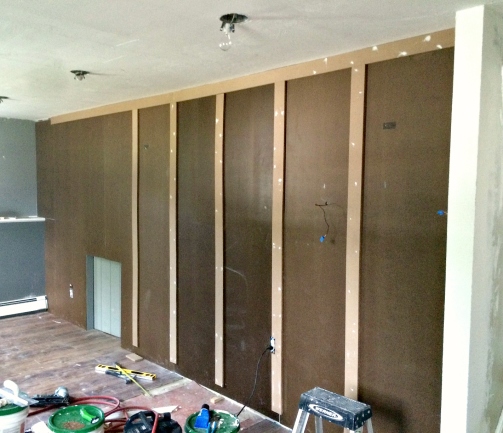
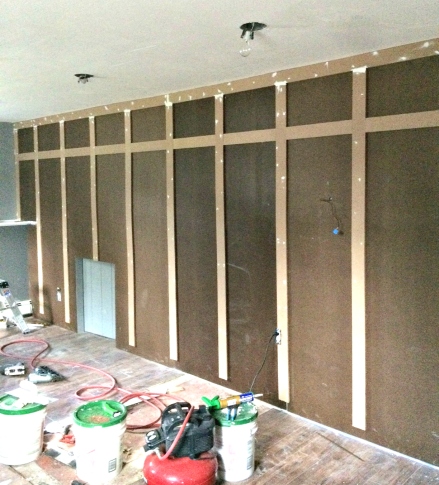
Now of course this was mostly Jason’s craftsmanship.. so here are his instructions: To attach each hardboard to the wall, hammer nails around the edges and ‘Liquid Nail’ in the middle. A tip for you: make sure you push out the air pocket from the middle or else you will have a small hump. If you can, leave this to dry and set for a night. You can see the hardboard in the pictures below!!
Creating the panels
Before beginning this step, I recommend deciding on the width and thickness of each baton (piece of wood in the paneling) and also the spacing of each of the batons. We decided on 3 1/2″ wide batons that were 1/2″ thick. Unfortunately our local Lowes did not sell the 1/2″ MDF we were hoping for, so we had to make a few visits to different stores until we found it. These boards come in 4′ x 8′ sheets and is what we used for the batons.
Here is the plan we used:

Here is a great link that gives you the math to work out the width of your panels, it was a great help.
At this point in the project I will spare you from the details of our debate. BUT needless to say, after some time I ended up fully understanding Jason’s math. We then cut the MDF lengthwise into 3 1/2″ x 8′ strips. Our plan was to use the full 8′ strips to create a border around the entire wall, and then use more long strips from ceiling to floor. The strips for the horizontal batons would be cut. We used our Miter Saw to cut the 8′ strips to the correct length on each of the horizontal pieces.
I can hear you all shouting at me about the joins on the hardboard and “won’t they show and look ugly??” just as I did. Butttt it turns out that Mr. Jason is truly maturing into a carpenter and thought of this! He made sure his math proved the batons would be spaced out to cover all the joins.
Fun Fact: these so called “batons” are ACTUALLY called “stiles” which I found out late in the game!
Also, I will mention this once so I don’t have to repeat: Make sure you use a Spirit Level to ensure each stile is straight. We attached each stile with a nail gun and some liquid nail.
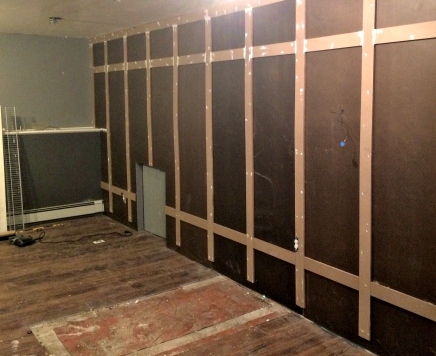
Start off with installing the top horizontal stile (see I remembered the correct name!). Use your spirit level to make sure its level. If you have a gap between the stile and the ceiling since your ceiling is not even, you can Caulk it later! Then install the bottom stile and again make sure it is level. Again, you can caulk any gaps later!
From our pictures below you will see we were missing some wood flooring due to taking out the old walls and closet, so we saved this bottom stile for last. You’ll see we accounted for the 3 1/2″ wide bottom stile when installing the vertical pieces.
Next step is to install all of the vertical stiles.
Once you have all of the vertical ones installed you can start to cut and hang the horizontal stiles to complete your boxes. Each of these were individually measured to make sure the dimensions were correct. “Measure twice and cut once” as my grandfather would say (corny but true). Soon it should be looking like this.
And soon after like this…
In the picture above you’ll see a little grey door.. this is an access point to our crawl space and the boiler. We have a split level home so there is lots of storage under there (which I love!). For now, the grey door will be painted to match the rest of the wall.. but eventually Jason wants to hide it with a panel so the entire wall ties together.. I will definitely share with you if and when it gets done!
All in all it took Jason about a day to install all of the stiles, but keep in mind this is one “Jason” day. This would also entail taking breaks to watch some soccer on TV and swim in the pool. So, I bet with two people fully focused it could be done in a couple of hours!
Once you have completed the installation phase of the paneled wall, the real fun begins (you thought all of this previous was fun??). Using wood filler, we filled in ALL of those nail gun holes and joins in between the stiles (Yes I still remember the correct name). Next we used Caulk to smooth out the harsh corners inside all of the panels to cover any small gaps.
Finishing touches!
Being the romantic couple that we are, we spent the following week’s evenings installing the pieces of floor in the areas that were missing and finishing up the other walls that needed repairs. I also sanded the wood filler and all of the edges on the panel wall. This helped remove any snags and slightly round out the edges. MDF is very easy to sand, so this step didn’t take long at all… maybe about an hour or so. In hindsight it probably would have been more efficient to sand all stiles before installing. I think I forgot to mention… Jason installed the bottom piece once the floor was in place. And we were fully ready for painting!!
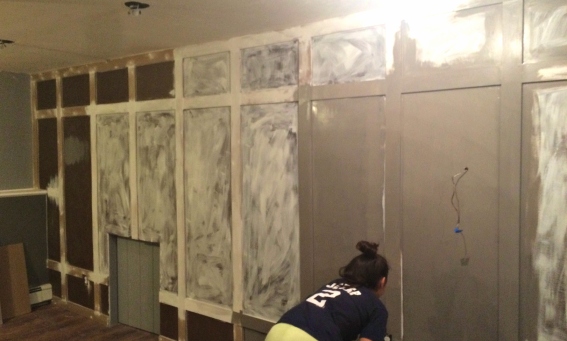
I primed the whole wall with my favorite Kilz Primer. (Never have I ever thought I would be designating a favorite primer.. who am I??) When I was close to finishing priming, I ran out of primer.. so thank you to my hunnie who ran out to get more!! As you can see in the picture below, I couldn’t wait for more primer and was desperate to see how my color choice would look. Anddd.. I would say it was just as pretty as I had hoped.
Jason took this picture to show how impatient I am! Woops! (By the way the Jeter shirt is just a scrubby- I don’t mind if I get dirty shirt!)
I stopped after this panel I promise!! We finished priming and let it all dry over night.
The next day..
The following morning I finished painting the first coat and I let it dry throughout the day.
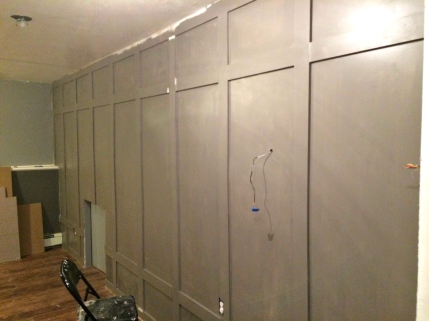
That evening I was free to paint the final coat.Oh! In case you are wondering, the paint color I used was Sherwin Williams “Mink”. It puts me in the best mood!!
And here it is, 100% complete in all of its glory
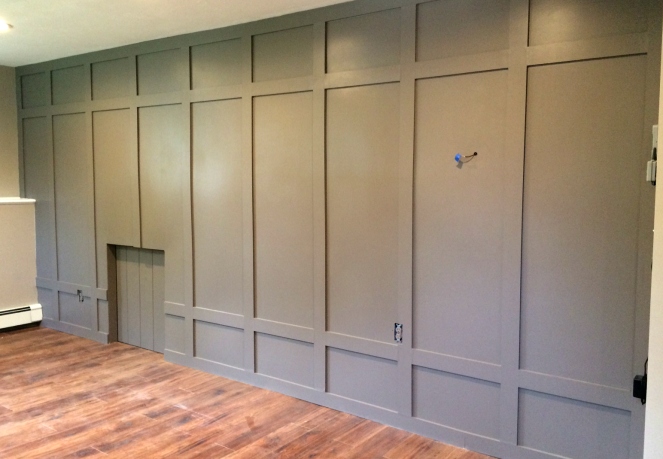
The wire that’s showing is for the thermostat, currently awaiting a new face plate. Of course, we will be putting up a TV soon so Jason can complete his sport room.
For those of you who are eagle eyed, you’ll see I have also painted the walls for the rest of the basement. I will definitely be sharing complete before and after pictures once we have finished decorating the entire basement! Oh! Another major notable mention…We had recessed lighting installed (I’m obsessed) and I replaced the popcorn ceiling with a slight textured look. I will share the how-to’s on removing popcorn ceiling soon!! Be on the lookout!
Much love as always!

https://www.instagram.com/vivalasdiy/
No comments:
Post a Comment