Lesson Learned: If there’s a will there’s a way!

 It just puts me in the best mood every time I see it. I love how clean it looks.
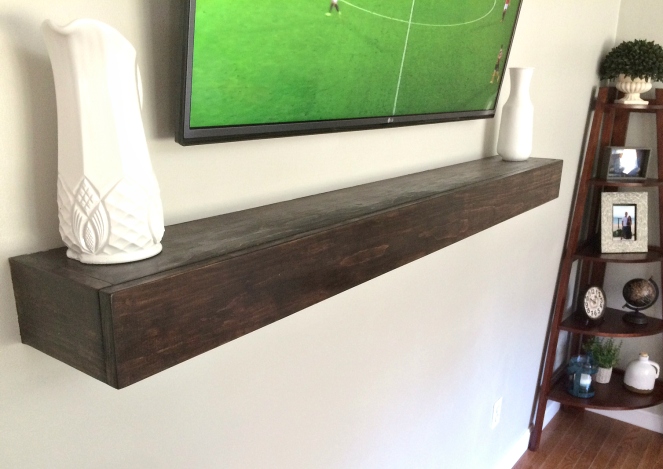
With all of our projects going on (the biggest being the basement) and our house looking as if a dusty tornado ran through it, I was feeling the need to make our Living Room feel cozy, clutter free and closer to being complete. We have vaulted ceilings in our living room, and our mounted TV looked very lonely on the large wall! Off to Pinterest I went, spending hours seeking inspiration until I finally found what I wanted: a wooden floating mantle to hang just below the TV!.
Stumbling block number 1… Have you seen how much a solid oak mantle costs? Who has that kind of money to spend and especially on a silly little thing like a mantle? Soooo back to Pinterest for help and it turns out many people have DIY blogs on how to create a Faux Floating Mantle. I sent a few to Jason and apparently “That’s simple” and he can make at the weekend. Since I am not crafty with tools and wood, I made sure he would leave the staining and finishing to me . Compromise eh? The challenge was on!
. Compromise eh? The challenge was on!
Stumbling block number 2… Jason has yet to grasp my need for 20 pictures, not 4, during these projects so I can give a simple step by step guide on to how it was done. That being said, I apologize for the lack of pictures but I will do my best to explain!
Now for the next part I give Jason a lot of credit, he kept a lot of the 2 x 4 pieces of wood from theknocking down of the basement wall . It turns out they would come in handy for this project and it saved us some $$’s which I love!


Just a reminder: the studs from the wall were taken down. On the right is Jason’s “I’m starting this project now” picture. A miter saw is one of his favorite tools to use I think!
Let’s rewind… Dimensions, Location and Hardware StoreBefore you get started, decide on the width, depth and length that you want the mantle to be. I decided I wanted the mantle to be wider that the TV so I could place vases and other decor on either side to hug the TV (Jason was adamant no decor would be blocking ANY of the TV screen- you know it would interfere with watching sports)!
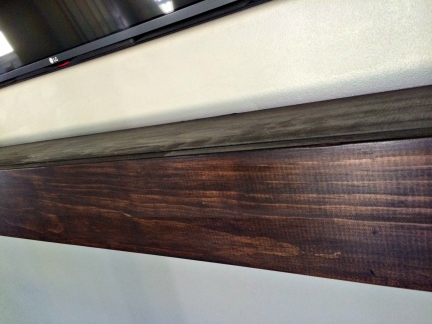
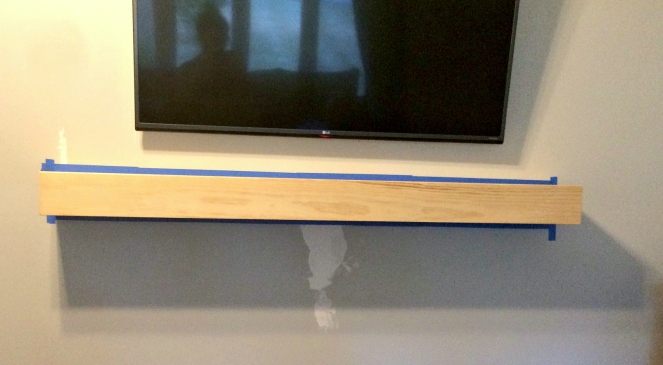
Once I decided on the placement of the mantle (how high or low on the wall), I drew a line and then placed a painters tape line on the wall where the top of the mantle should be. I used a level to make sure that it was nice and straight. You can see the taped line on the staining picture below. The tape served 2 purposes, marking location and wall protection from stain, not that the latter was thought of on stage 1!
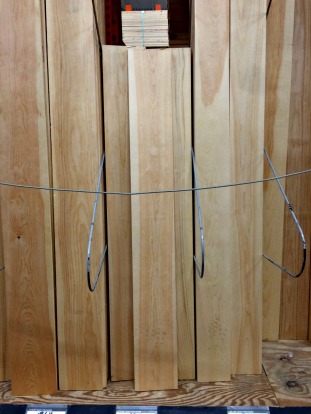
Then you’ll need to make one of your weekly fun trips to the hardware store to buy what you need (I’m assuming you have the tools). Lately we seem to spend our Friday’s buying ice cream from our favorite diner and walking around Home Depot for supplies – try it, it’s fun.Here’s what you’ll need:
- 3/4″ pine boards for finishing- Amount varies on your dimensions
- 2 x 4 studs for support frames – They come in varying lengths
- Wood Glue
- Screws / Finishing nails for putting it all together
- 3″ wood screw to secure frame to the wall studs
- Sandpaper for making it nice and smooth
- Pre-Stain Wood Conditioner
- Finishing Stain of your choice – I used ‘Kona”
- Polycrylic
Step 2… Make up the E support frame…
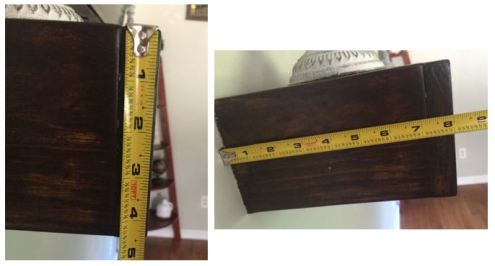
Using the miter saw cut a section of the 1×4 into the length that you require. You could use a hand saw or a circular saw if you do not have access to a miter saw. My mantle was going to be 5ft long so this piece was cut to 4ft 10 1/2 inches. The reasoning why its an 1 1/2 inch shorter becomes clearer later.
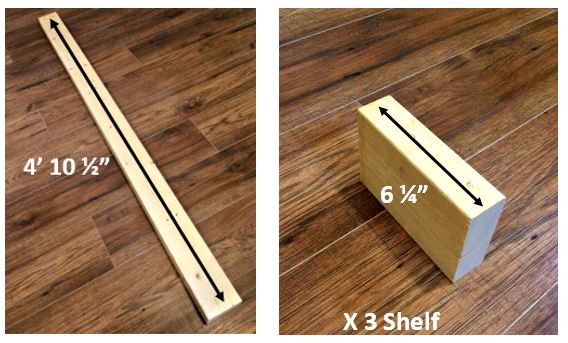
Cut the 3 shelf supports to the required length factor in the 2×4 and the width of the pine board. I wanted it 8 inches deep so it felt chunky enough and give me enough room to place decorations. Just to make you feel better, I changed my mind 100 times, it’s only natural to. Jason did the math and each support was cut to 6 1/4 inches
Because our mantle would be not holding masses of weight, it would be screwed into 4 studs, the 3 shelf supports would give more than enough support needed.
Time to assemble…
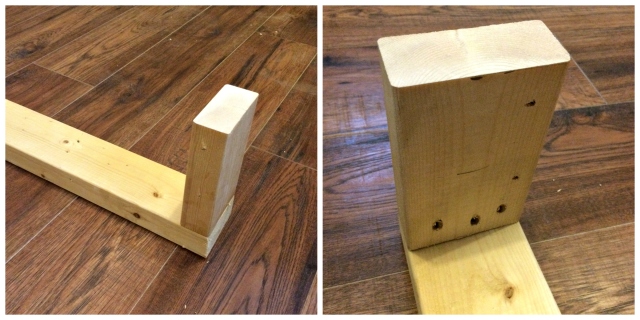 Screw and Wood Glue the 3 supports onto the wall attachment piece, one of either end and one in the middle, make sure they are square. You need to pre drill some pocket holes to prevent the wood from splitting. I would recommend using a Kreg Jig but Jason is lazy so he went free hand. He did 3 screws in each piece to be sure. This can be seen on the right hand picture.
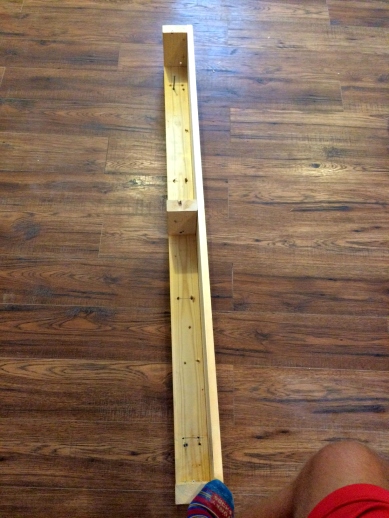
Your frame is now complete and ready for wall mounting and should look something like ours did below. WARNING: The top of the mantle is attached here, apparently he wanted to check it it was all measure correctly and to drill some pilot holes before it was on the wall. But attached the E-Frame to the wall before any of the covering.
Step 3…Pray that there are studs where you want the mantle to be and secure frame to wall
Luckily for us there was. I used my stud finder and marked the location on the wall during my location and sizing up session Friday night. This gave Jason a reference but no doubt he did his own checks… he trusts me really.
This is where my handy piece of taping and pre-marking of the studs helped out… or so I like to think.
This is where my handy piece of taping and pre-marking of the studs helped out… or so I like to think.
- Hold the frame up to the wall to mark the location of the studs and pre-drill 2 holes in the frame on each stud line. This gives a nice strong attachment to the wall and will stop it from falling down. We had 4 studs in line so he attached it with 2 screws in each
- Jason used the 3 ” wood screws to fix it to the wall
Step 4… Cut and attach the top shelf
Now you need those pine boards to start making the shelf. The top was cut to be the same length as the support beam and the width was cut to be flush with the ends of the shelf supports, the front piece would add the extra 3/4″ I wanted (See I told you it would make sense!!).This was screwed and glued on from the inside so there were no nail holes on the outside that would need filling. Jason used screws and counter sunk them slightly through the frame into the back of the top shelf – be careful not to use screws to long that will go through the shelf. You could use a brad nailer and secure through the top but that requires filling, I don’t like filling. Home Depot will make the cuts for you.
Step 5… Cut and attach the 2 sidesThese were cut to be 4 1/2″ x 7 1/4″. As with the top, the sides were screwed and glued on from the inside so there were no nail holes on the outside that would need filling. The same screws and counter sinking was down from inside in framing. In effect this creates a box without a bottom.
You can see how the the sides cover over the edge of the top piece and the internal supports.
Step 6… Cut and attach on the bottomWe bought a cheap piece of 1/8″ plywood simply for covering and enclosing the box. This was nailed on from the outside, for obvious reasons and fitted inside the sides and front piece to keep it hidden.
Step 7… Sand and SandI think this is self explanatory. I used our orbital sander with a fine grit sand paper until it was nice and smooth. I sanded the sharp edges to make them slightly rounded.
Step 8… Pre StainThose of you who have been with me before know that during my kitchen table renovation I had a nightmare when staining the top. I was not going to let history repeat it’self and opted to use somepre-stain as a precaution. I don’t think I will ever stain again and not use this stuff – it’s magical.
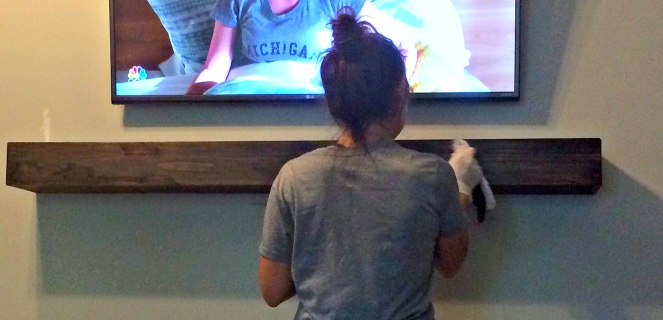
Step 9… Stain and protect For this step out comes my trusty Rust-Oleum ‘Kona” stain that I have used on my kitchen table and the bedroom dresser. I love the color it gives and how I can vary the shade so easily simply by leaving it on longer or applying a number of coats. Also it means the wood work through out my house matches!
For this step out comes my trusty Rust-Oleum ‘Kona” stain that I have used on my kitchen table and the bedroom dresser. I love the color it gives and how I can vary the shade so easily simply by leaving it on longer or applying a number of coats. Also it means the wood work through out my house matches!
As with all staining do not worry about being neat when applying with a foam brush. I past in on pretty roughly, my only rule is that it all needs equal covering.
I left it to soak in for a couple of minutes and then used some rags to work it in and reveal the grain. Then I repeat this step as I feel necessary to get the shade I desire. For this project, one complete coat and a couple of small touch up coats over the next 3 days was enough to satisfy me. A final coat of Polycrylic and she was complete.
I left it to soak in for a couple of minutes and then used some rags to work it in and reveal the grain. Then I repeat this step as I feel necessary to get the shade I desire. For this project, one complete coat and a couple of small touch up coats over the next 3 days was enough to satisfy me. A final coat of Polycrylic and she was complete.
FYI… It took me about 3 days to decide what shade I wanted so…DO NOT APPLY POLYCRYCLIC UNTIL YOU ARE 100% HAPPY!!
Finished… Until I find 2 Candle Stands to replace those Jugs
Thank you for joining me… please feel free to leave me a comment on how I did. If you were inspired to take on a project yourself then please share it with me.
We will talk again soon.
Much love as always
XX

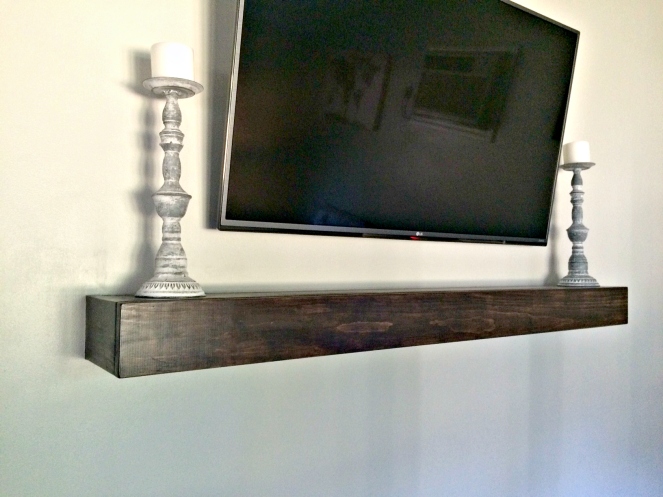
And by the time I got around to finish writing the blog I had been to my favorite accessory store, Home Goods. SO here she is 100% complete… I hope you like her as much as I do.
https://www.instagram.com/vivalasdiy/
No comments:
Post a Comment