
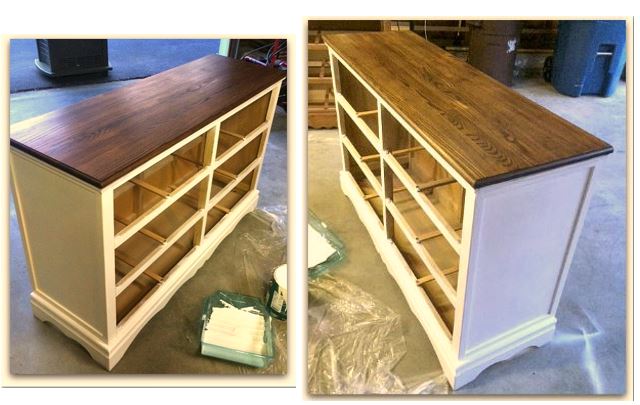
Lesson Learned:Furniture may take on a persona when you least expect it
I could squeal with excitement..I picked up this dresser for $40 from a Facebook yard sale! AND as an added bonus, the seller threw in a matching dresser with hutch, a coffee table and some lamps!! She was retiring to Florida and just wanted to declutter, and as you can imagine I was happy to take it all- thrilled to see what I could do with it. Check out the redo’s of these bonus items [here]!
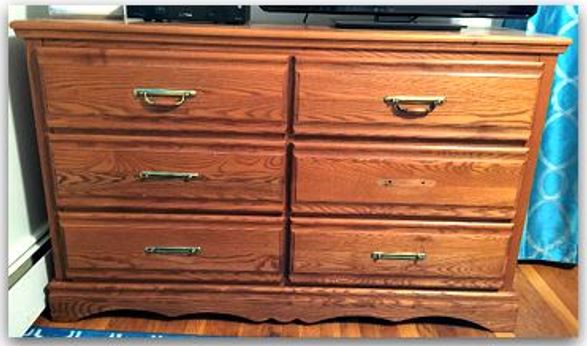
Before moving into the house, I made a decision to try and keep all the furnishings within the house a similar country theme, so this dresser’s fate was to be painted white. But Jason had convinced me an all white dresser would be a bit boring and he showed me a few pictures of white furniture with contrasting stained tops. He was right (see Jas!!) the grain was too nice to cover up with paint.
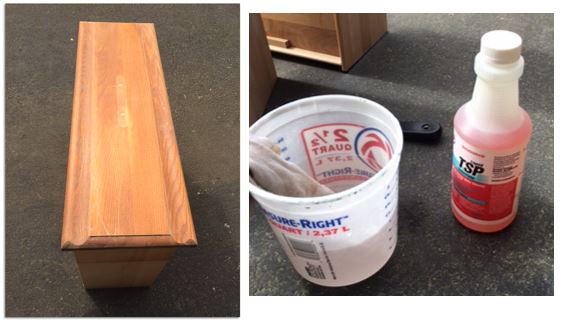
Clean and sand drawers / dresser (minus the top)The first thing I did was remove all of the drawers and apply some TSP with a rag to remove all dirt and grime. It is pretty nasty to see what comes off! I cleaned all of the drawers and dresser, but did not touch the top since I would be starting that a little later. After removing the hardware from the drawers, I used my Kwikwood Putty to fill the holes (we want new updated hardware, obviously!!). I then followed up with a quick sand by hand- I mean quick, about 30 seconds per drawer, until my putty was smooth. I continued to focus on the drawers and remainder of the dresser first. Trust me it makes sense to leave the top of the dresser for last! Promise!
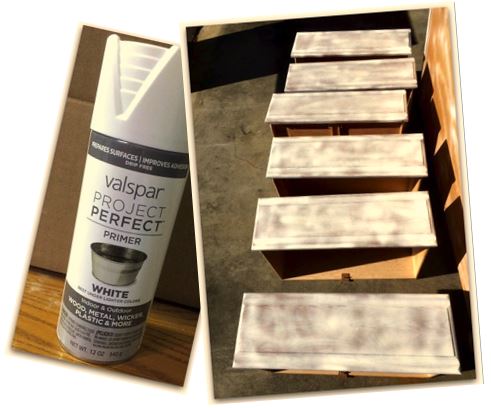
Prime her up…My next step was to get out my newfound love: spray on primer. I had used this on projects in my past pre-blogging life, and have recently realized how amazing it is. I’ll admit I am pretty impatient, and this makes things SO much quicker. I used Valspar’s project perfect primer, which from my past experiences I know works perfectly well!
Fun fact: I was using my Mom’s garage for the project and didn’t worry about ventilation or covering the floor, which turned out to be a big no no. The spray paint “cloud” settled on her clean cement floor, and I was left spending an extra 30 minutes or so using Paint Stripper to remove the paint marks, fun for everyone!!
Back to the project… one can of spray primer was enough to prime all 6 of the drawers and half of a can was used for the two sides and front of the dresser, top excluded. I did not worry about the back because well who cares? no one will see that when it’s butted up against the wall, right? As I confessed earlier, my love for this type of primer proved to be true as it dried really quickly, around 30 minutes. I used this time to move on to the top.
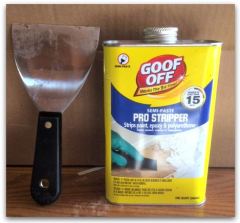
Getting on top of things now…While the primer was drying I painted on a thick layer of Goof Off Pro Stripper with a cheap paint brush (one you will never need to use again) and let it soak in for 10-15 minutes.
It’s like a science experiment really, the way it begins to bubble and turn a misty white. Once it has reached this goopy consistency you’ll know it is ready to scrape off. I then used a wall paper scraper to remove everything, and it surprisingly comes off very easily. Scrape in the direction of the grain to avoid chipping off any wood.
Our dresser had a beveled edge, so I used a wire pad (similar to a brillo pad) to rub off the ‘Goof Off”.
Next, I gave it a quick clean down with some of that TSP to make sure all of the Stripper was removed.
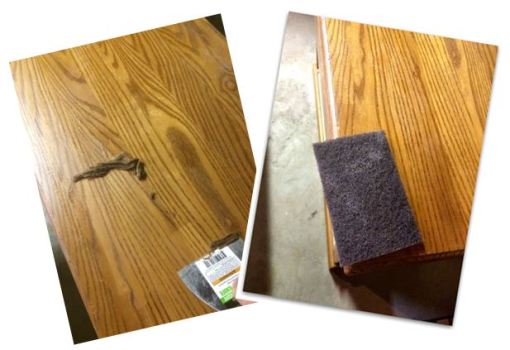
Calling in Jason for some help…For the next step I needed to call in Jason for some help, I do not trust myself using an electric sander yet! The noise alone still scares me! He started with some 80 grit sand paper and then finished with some 250 grit paper to achieve a nice smooth finish. Please do this outside so the dust does not ruin your house. Like I mentioned we used my Mom’s garage that we have taken over, I will have to thank her again and again! As with the stripping (I can’t type this without a quick smirk, I’m so childish) sand in the direction of the grain. You can see here the difference in color of the sanded and not sanded line…
I used some smaller pieces of sand paper to get into the detail on the edges. Once this was done I gave it a quick wipe down with a damp cloth to remove any bits of dust and she was ready for finishing!
My directions are nicer than the tin’s…
I never really appreciated the need for wood conditioner (I am impatient!!) until a carpenter friend recommended it to me. It helps the wood stain soak in evenly and gives you a professional finish. I used Minwax Pre-Stain Wood Conditioner, again because my carpenter friend recommended it. It worked wonderfully.
I never really appreciated the need for wood conditioner (I am impatient!!) until a carpenter friend recommended it to me. It helps the wood stain soak in evenly and gives you a professional finish. I used Minwax Pre-Stain Wood Conditioner, again because my carpenter friend recommended it. It worked wonderfully.
I’ll be honest we followed the instructions on the back of the product step by step, but I think you prefer listening to me! To apply the conditioner I dabbed a rag and applied a coat to the top of the dresser. I let it soak in for 20 minutes or so. Be sure to wipe off the remainder.The can says you have about an hour to stain the surface after using the conditioner so make sure you have enough time to do both!
My directions are nicer, I swear…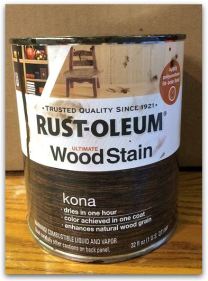 Now it was time to stain the top of the dresser- the piece I was looking forward to doing to most, apart from it being finished and in our new house that is! I had picked out this stain to use, mostly because I liked darker wood and the name ‘Kona’, also the Home Depot associate recommended it.
Now it was time to stain the top of the dresser- the piece I was looking forward to doing to most, apart from it being finished and in our new house that is! I had picked out this stain to use, mostly because I liked darker wood and the name ‘Kona’, also the Home Depot associate recommended it.
I used a rag to heavily apply the stain all over, I tried to be as even as I could to make sure everywhere was covered equally. Like it says on the can, I let it soak in for 10-15 minutes and then used a fresh rag to wipe it all off. Hopefully this picture shows the dramatic difference between the 2 steps. I just love it, I’m obsessed.

And here it is fully rubbed down / in, I’m not sure what the correct term is here…you can decide.

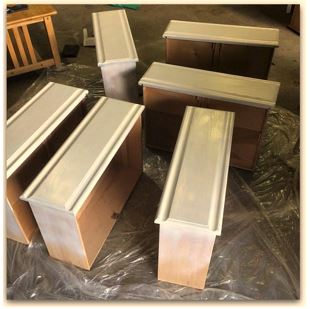
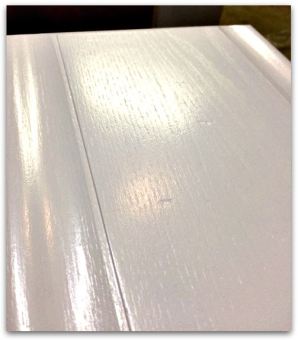
Back to her bottom…Jason and I double-teamed this portion to reallllly get the project done quicker. One of us used a mini foam paint roller, while the other used a brush for hard to reach places. We applied 2 coats of paint an hour or so apart which achieved the solid look we were hoping for. Once the paint was dry (honesty moment – I left them in the garage for a week before doing this, I had a busy week!) using a sponge I applied a thin coat of Minwax polycrylic. This is a milky white and would blend nicely with our white paint color. The polycrylic hardens the paint and creates a nice shield to any elements.

Putting her back together and adding some new accessories (hardware)…

I don’t think there is much explanation needed here, find what you love and just make sure they are centered. Oh and please pre-drill some teeny weeny holes for the little screws to avoid any splitting.
Again because we did not have our house yet, we left the dresser in pieces in the garage for a week to dry. I know that if you try to put them together to quickly the paint is not cured yet and will stick when the doors are closed. This will cause the paint to peel off. So be patient in putting it back together.
And she’s finished, in her new spot in the house!
Pssst… That mirror a big DIY Success as well. You can see its transformation as soon as I have written it. Check back soon!
Much Love

No comments:
Post a Comment